Sunday, October 27, 2013

Week 10: Exploring Sensor Ideas

Now that I have the groundwork for NXT-Arduino comms up and running, I've begun throwing around various ideas for custom sensors to implement. I've been throwing most of these ideas around in my head, and I'm going to very briefly identify the ones I feel are most viable, and jot down a few spurious ideas about each.

IR Receiver - This is a relatively simple idea and should be comparatively easy to implement. Attach an IR photodiode to the Arduino and run some processing on the signal. Then package the data for transmission to the NXT.
  • Perform IR code processing through custom solution or pre-existing IR library
  • Need to keep data processing asynchronous, will have to store results until NXT polls
  • Needs some form of queuing structure, can infinitely expand (within memory limits)
  • Sensor is useful for remote control of the bot, and IR remotes are everywhere
  • Need to determine if code recognition is done on the Arduino or NXT side
6 DOF Gyro/Accelerometer - Slightly more complex, I have a SparkFun module laying around that could be interfaced with the Arduino. Several possibilities here for practical use, and can also more clearly demonstrate the concept of register bank for multiple sensor values.
  • Possible problem with the A4/A5 analog pins on the Arduino being the only hardware I2C lines available. It should be possible to attach the the module and extend the bus on a particular sensor line, but I really want to keep separation between the NXT and sensors discrete. Software-side bitbanging of the protocol is an option here
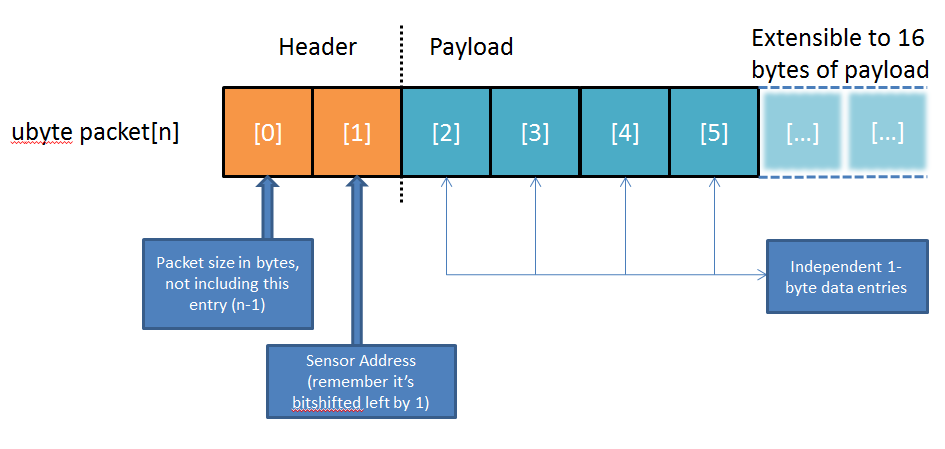
  • No need to store previous sensor values, can simply maintain a bank of 6 registers (3 per axis, per sensor means 6 total registers). NXT can address each register independently to access each of the two "sets" of available data (gyro or the accelerometer)
  • Latency may become an issue given the real time nature of the sensor, to retrieve measurements along all DOFs will require three separate polls for three separate register accesses. The latency of consecutive I2C accesses can be factored out by driving multiple I2C buses and then running three parallel accesses instead of three consecutive accesses on the same line. The tradeoff is port use on the NXT.
Electret Mic - An idea I've been throwing around, use a mic for tone recognition. This could serve similar purposes as the IR Receiver for remote control, or possibly recognition of the surrounding environs (buzzers/sound elements/etc.). The Arduino Uno's Atmega328 is a little skimpy for real time processing at any level above an FFT, so I think I'll stick to that for pitch recognition.

Sunday, October 20, 2013

Week 9: NXT-Arduino I2C Interface Protocols

Now that I2C is working and we are capable of bidirectional data transfer at the behest of the master device, it makes sense for there to be some standardized protocol in play to govern communications.

 To recap the working model I'm going with, the NXT is the bus master and will initiate communication with a sensor when polling it. This data transaction will first involve the NXT transmitting a "register selection" packet to the sensor, the payload of which will contain the address of the sensor register to retrieve. The sensor will, upon receipt, switch to the proper register. In my Arduino-side code, this is emulated with a state variable. It is important to note that the register selection packet does not instruct the sensor to do anything other than select a register. It is not until the NXT runs readI2CReply that a "data request" packet is send over I2C to the sensor, upon which the sensor replies with the data requested. At this point all communication should cease (maybe barring an ACK packet), and the bus will lie dormant until another poll begins.

Fig 1. Diagram showing data transaction and change of register selection.
Another critical piece of the data transfer process that I've been somewhat glossing over is the actual format of the I2C packet. While the Arduino's Wire library will handle most of the I2C nuts and bolts, abstracting the user from having to program it all, RobotC makes no such allowance. In RobotC the sendI2CMsg function accepts a ubyte pointer to an array containing entries which constitute an I2C packet. Like all packets this one consists of a header, and a payload. The header contains entries for message size and address, while the payload contains the packet's data.

Fig 2. General packet structure of a RobotC packet, to be transmitted by the NXT.

An important note on the Arduino's Wire library, the transmission of data using the Wire.send() method will transmit whatever I2C bytes are passed to it. This is done with 1-byte payload packets for all data given; passing in an integer will result in data loss as it will overflow the 1-byte payload allocated for it. This can be overcome by splitting transmission data into multiple pieces, and then passing the send() method an array of bytes, this will be realized as a series of 1-byte packet transmissions back to the NXT. RobotC's readI2CReply() must have the size of this reply packet provided as an argument to ensure that all the sensor data is received properly.

Sunday, October 13, 2013

Week 8: I2C comms are working!

The majority of this week was spent hammering out issues with the NXT and Arduino. However it all paid off, and now the two devices are finally communicating over I2C!

Previously I had encountered an issue with the SDA line not being driven. This directed me towards the NXT, and upon close inspection it appears I had configured a pragma statement to use the wrong port. For reference, the relevant (and now correct!) line of code is:

#pragma config(Sensor, S1,TIR,sensorI2CCustom)

After debugging this and fixing it, the SDA line now drove data correctly and everything seemed okay on the NXT side. The issue now, infuriatingly enough, was that the Arduino did not seem to be receiving the data correctly. The code uploaded to the ChipKit was simple enough, a simple polling loop waiting for I2C data to come in. Through my debugging, I found that the packet receipt was being recognized, however none of the data was being decoded properly. Recall from the Lego I2C spec that the first packet transmitted by the NXT to a device simply contains the address of the register for the sensor to read/write. The info I was decoding on the ChipKit side was malformed or corrupted somehow, and it was mostly garbage.

To cut to the chase, I'm entirely unsure why the 022 libraries didn't work, and I gave up them. After a few hours of debugging I tried my own reference Arduino Uno on a whim, using an up-to-date Wire library to see if it would work. Surprisingly it did, and my data was now coming through cleanly. To cut my losses and prevent any more time from being wasted, I'm going to recommend using reference Arduinos from now on, and moving forward I'm going to ditch the ChipKit. This will allow me to use the most recent Wire library available, albeit the tradeoff will be fewer pins and a weaker processor.

Sunday, October 6, 2013

Week 7: The NXT has arrived!

I've received the NXT this week, and I am happy to report I've begun experimenting with my hardware.

After some software setup on the NXT side (The RobotC firmware must be burned to the NXT), I began by physically connecting the two devices. I did this by following the schematic referenced in my week 3 post, in which I fashioned a DIY connector after cannibalizing a sensor cable. My immediate goal is to establish simple communications, so I made my adapter pin-compatible to plug directly into the ChipKit itself.

A picture of my connector, note the 82KOhm pull ups soldered onto the header pins
....and socketed into the ChipKit
With the physical connection out of the way, I proceeded to program each board with slightly modified but conceptually identical code to the one provided by the DexterIndustries site. Because Blogger doesn't handle formatting well, and because I'm going to include more polished electronic copies of my code in my final overview anyway, I'm not going to paste the code here as it would just waste space. I will however post the link to the code templates I'm using down below. The important part is that the Arduino and the NXT have been programmed for bidirectional I2C communication, with the NXT acting as the master device. This code follows the Lego spec for comms detailed in last week's post.

One really important thing is that the code posted on the dexter site seems to be designed for Arduino 1.0 or above. This is evident through the use of the v1.0 Wire.read() method, which is not available in the 022 libraries. Now the equivalent 022 method is Wire.receive(), which I've substituted into my code. Again this change is really important to note, because the ChipKit isn't talking with the NXT and I'm not sure why.

That brings us to the present, where I'm almost entirely certain that the messaging logic of my code is functioning correctly. My prediction is that some fault exists where I2C is handled, and thus I've hooked up my Saleae logic analyzer to the SDA/SCL lines. It appears that while the NXT it driving the SCL clock line correctly, there isn't any data being passed on the SDA data line. This indicates a fault with the NXT as the current RobotC code should initiate communications with an I2C packet addressed to the Arduino. However nothing is being sent, so here we are...

I'm going to continue analyzing the issue, until I can get the I2C into a working state everything is stuck on this.


http://www.dexterindustries.com/howto/connect-the-arduino-and-the-lego-mindstorms-together/